Authorizing API calls
Introduction
LiveChat uses OAuth 2.1 protocol for authentication and authorization for all of its services. Before you continue, make sure you understand the difference between them.
- Authentication is making sure that somebody really is who they say they are.
E.g.: Checking your passport at the security check is authentication. - Authorization is assigning rules about who is allowed to do what.
E.g.: Allowing you to take first class seat is authorization.
In terms of LiveChat apps, authentication is when you check the user credentials to see if they are signed in. Authorization is when you look up whether you allow them to do something.
Throughout the document, we'll also use the terms public and private apps:
- public apps are available to all LiveChat customers, who can install it from the LiveChat Marketplace.
- private apps are only available within a LiveChat license that created the app. They're a way to go if you want to build an internal app for your chat Agents only. Unlike public apps, private apps don't ask users for an access grant.
Use cases
Decide which authorization flow to choose based on your use case.
| Use case | Recommended flow |
|---|---|
| Sending requests to LiveChat API | Personal Access Tokens is the fastest way, but all other flows are also possible. |
| Testing an app during development | Sign in with LiveChat is the fastest, but all other flows are also possible. |
| Building public web apps | Sign in with LiveChat, Implicit grant |
| Building private web apps | Sign in with LiveChat, Implicit grant |
| Building public server-side apps | Sign in with LiveChat, Authorization code grant |
| Building private server-side apps | Personal Access Tokens for the personal use of the app, Sign in with LiveChat or Authorization code grant for all agents within a license |
Read more about creating LiveChat apps or go straight to Developer Console and start building.
Agent authorization flows
All of the following authorization flows let your app acquire an access_token. With this token, the app can call the following APIs on behalf of an agent:
- the Agent Chat API
- the Configuration API
- LiveChat Accounts API
- HelpDesk API
- Reports API
To make calls to Customer Chat API, you need a different access_token. For that, see Customer authorization flows.
Personal Access Tokens
Unlike other authorization flows that let you acquire a token for your app, Personal Access Tokens (PATs) are generated per Agent. PATs are great when you want to make a quick call to the LiveChat API or test out the app you're working on.
To sign a request with a Personal Access Token, you need to:
- Create a PAT in Developer Console.
- Use your
account_idand PAT in the Basic authentication scheme to send a request.
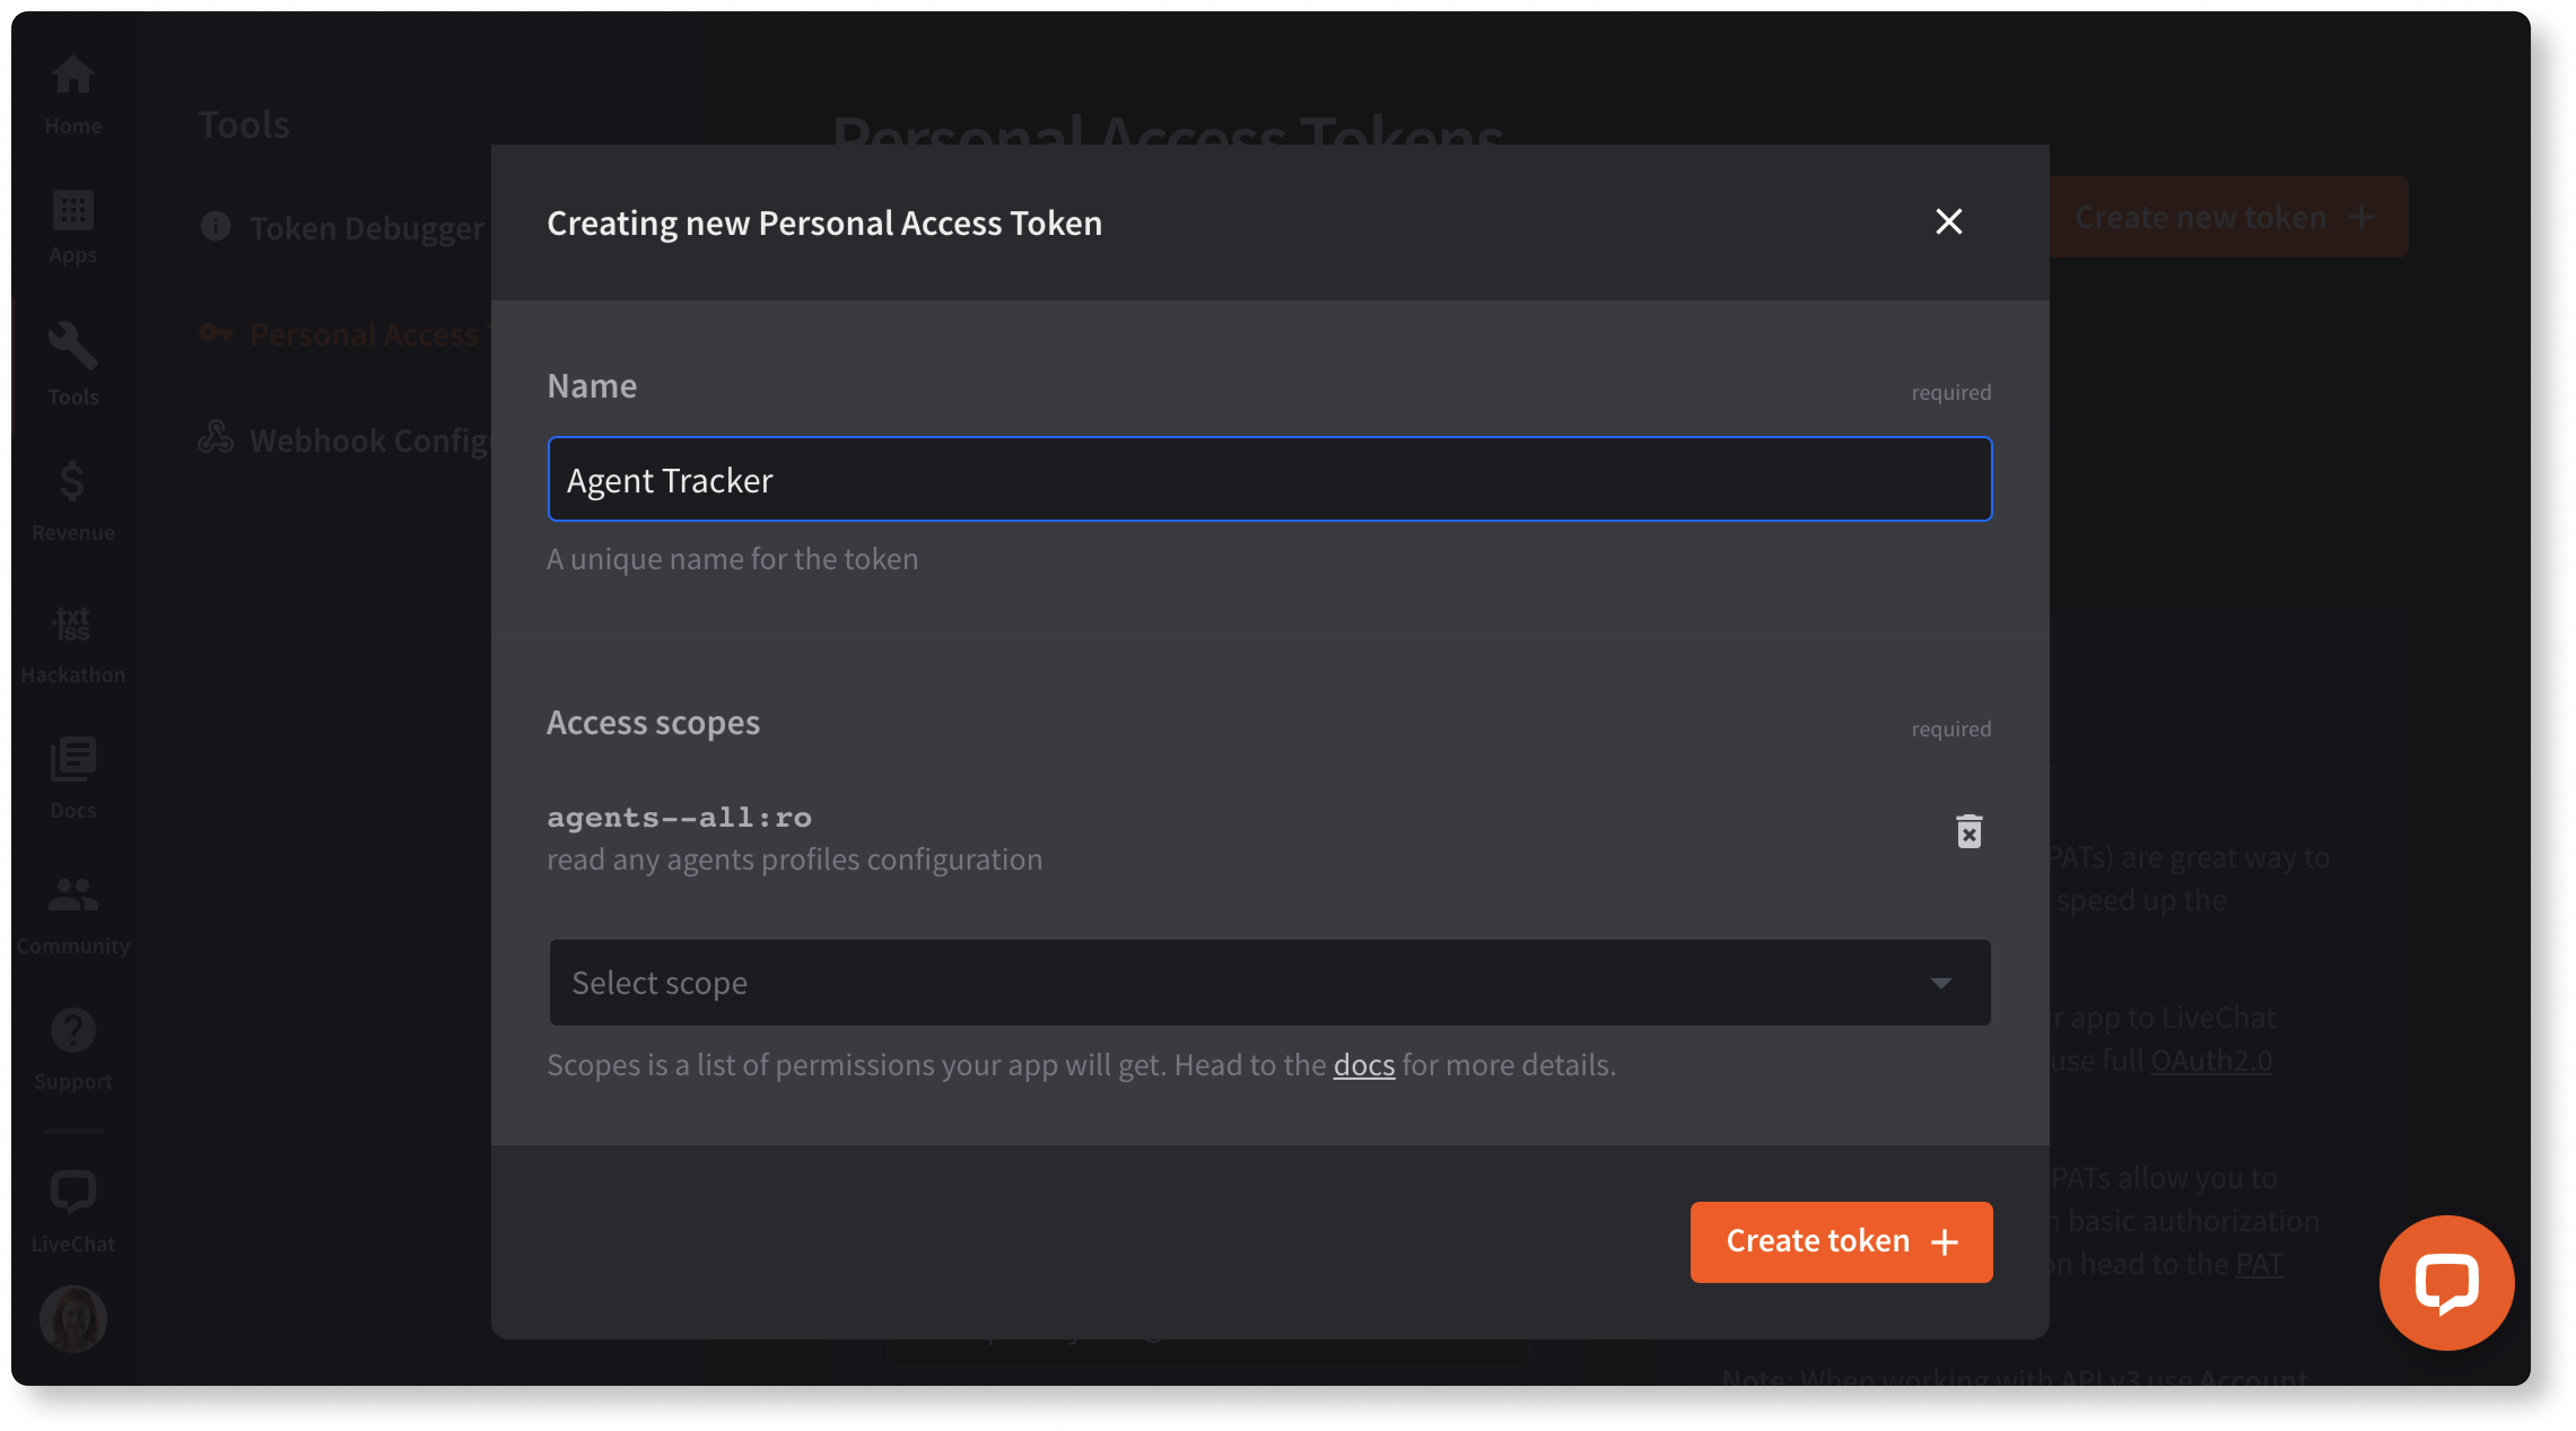
Step 1: Generate a PAT
Start in Developer Console. Then, go to Tools -> Personal Access Tokens and create a new token together with necessary scopes. You won't be able to change those scopes once you create the token.
Step 2: Use your credentials to send the request
Personal Access Tokens use the Basic authentication scheme. For that reason, you need a username and a password. Please note that with Basic Auth, you need to encode your credentials using base64.
Use:
- Account ID as the username for the Agent Chat API v3, Configuration API v3, Global Accounts API, and HelpDesk API
- Entity ID (your LiveChat login) as the username for the Configuration API v2 (the legacy version)
- PAT as the password for the APIs v2 and v3
Once you have your credentials, you can call the Agent Chat API, Configuration API, LiveChat Accounts API, or HelpDesk API. Other LiveChat APIs don't support PAT authorization.
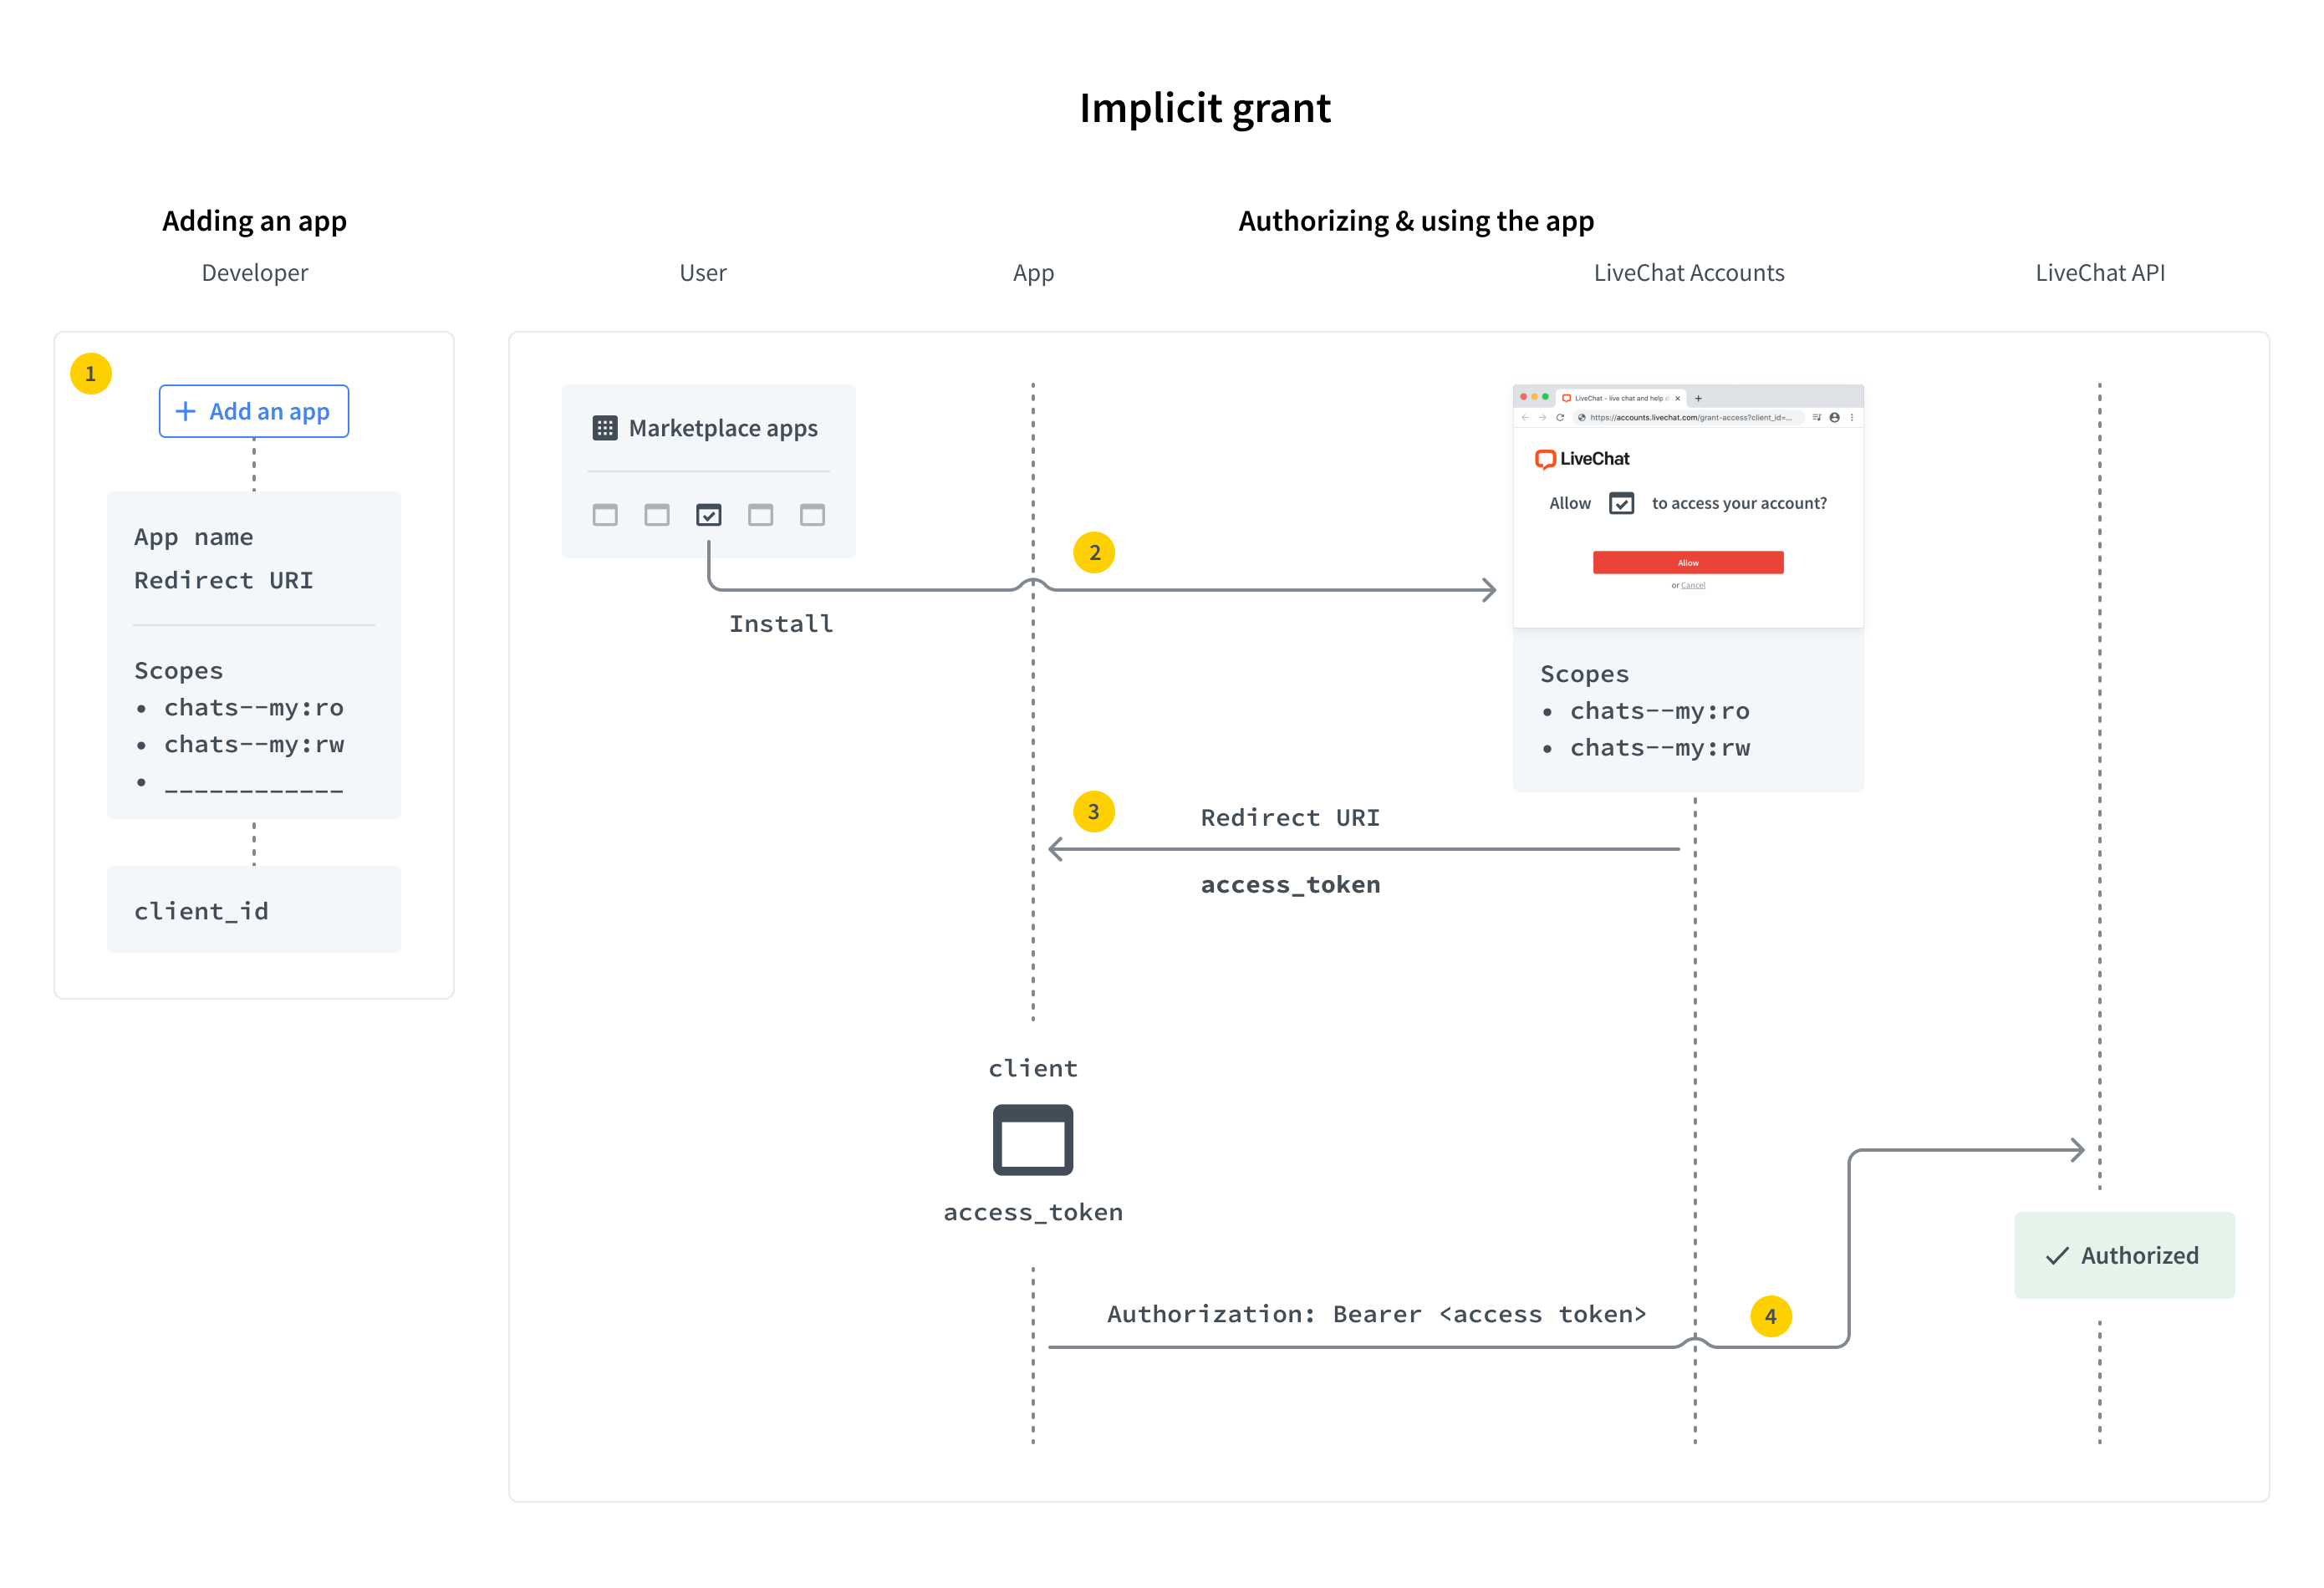
Implicit grant
Implicit grant is an authorization flow recommended for JavaScript web apps, but it works for both types: JavaScript and server-side apps.
To set up your own web app, you must define the URL of the app and the list of scopes. Scopes determine which parts of a LiveChat user's account your app will have access to. A LiveChat customer who enters your app URL will be asked to enter their login and password and grant the access for your app. Then, the user is redirected to your app with access_token included in the URL.
There are a few steps in the process:
- Step 1: Create an app in Developer Console and configure the Authorization building block
- Step 2: Redirect the users of your app to the LiveChat OAuth Server
- Step 3: Get an access token from the URL
- Step 4: Use the token in API calls
Step 1: Create an app
If you don't have an app yet, start by creating one in Developer Console. The app is a LiveChat OAuth 2.1 Client with its Id and Secret. You need to configure the Authorization building block of your application. See the guide to learn how to do that. Since this is the Implicit grant authorization flow, you won't use the Client Secret of your app. Feel free to skip the part about Client Secret in the guide; the rest applies without any change.
Step 2: Redirect users to LiveChat OAuth Server
When users run your app, they should be redirected to the LiveChat OAuth Server, which can be found under this URL:
https:/
Request
| Parameter | Required | Description |
|---|---|---|
response_type | yes | Value: token |
client_id | yes | Client Id from Developer Console (Authorization block) |
redirect_uri | yes | One of the URIs defined in the Authorization block during app configuration. The LiveChat OAuth Server will redirect the user back to this URI after successful authorization. |
state | no | Any value that might be useful to your application. It's strongly recommended to include an anti-forgery token to mitigate the cross-site request forgery. |
prompt | no | Value: consent. For testing purposes. It forces the app to ask for access to certain resources. It’s necessary for you to test the app as if you were a user who installs the app from Marketplace. |
EXAMPLE REDIRECTION TO LIVECHAT OAUTH SERVERhttps://accounts.livechat.com/
?response_type=token
&client_id=9cbf3a968289727cb3cdfe83ab1d9836
&redirect_uri=https%3A%2F%2Fmy-application.com
&state=i8XNjC4b8KVok4uw5RftR38Wgp2BFwql
At this point, the app should ask the user to allow it to access certain resources and perform certain actions. The list of resources and actions is automatically created based on the scopes selected for your app in Developer Console.
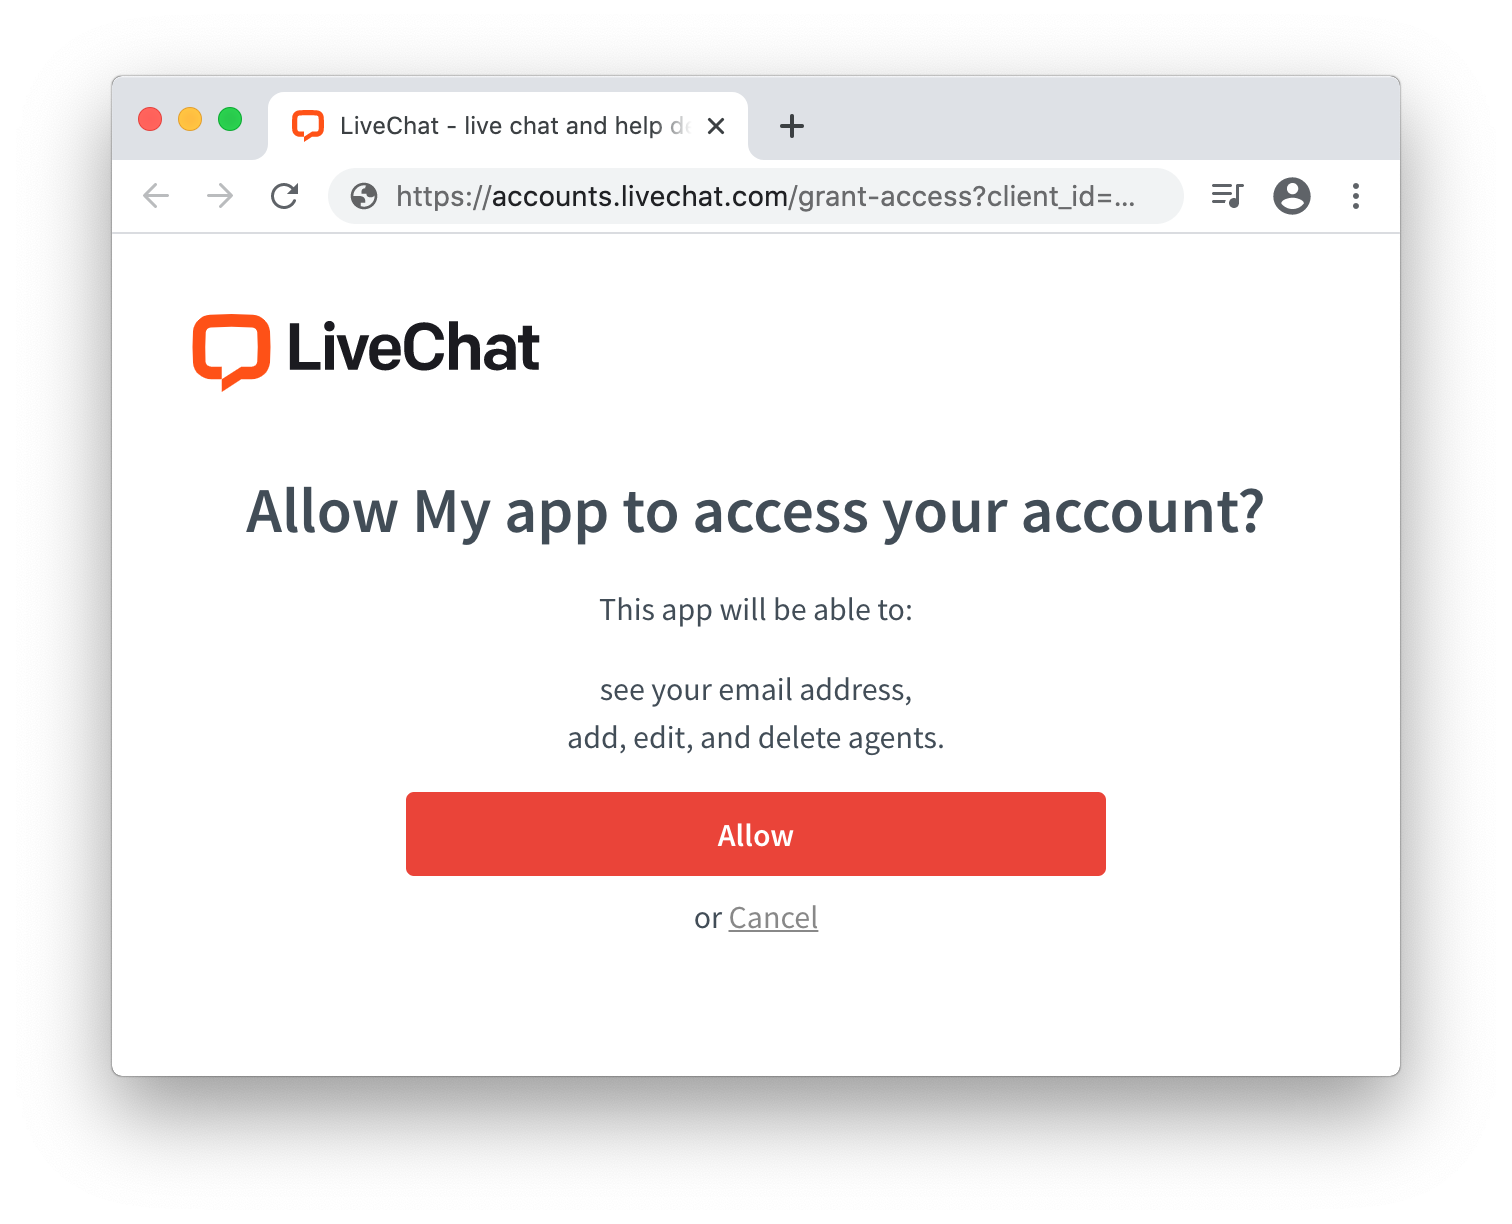
Keep in mind that as the app author, you won't see this screen. Use prompt:consent to verify this step from the user perspective.
This step is also omitted for private web apps installed by Agents from the same license.
Step 3: Get an access token from the URL
After a user authorizes the app by clicking Allow, they are redirected back to your application (to the Redirect URI you specified in Developer Console). The URL includes a number of parameters, including the access_token.
Response
| Parameter | Description |
|---|---|
access_token | The token you can use to call LiveChat APIs on behalf of the user. |
expires_in | The number of seconds the access_token will be valid; 28800 sec by default. When it expires, you will need to repeat the authorization process to get the new access_token. |
token_type | Value: Bearer |
state | The value of the state param that you passed to LiveChat OAuth Server in redirection. |
💡 Got stuck? See common Errors.
https://my-application.com/
  #access_token=dal%3Atest_DQTRHGbZCFkAoss4Q
  &token_type=Bearer
  &expires_in=28800
  &state=i8XNjC4b8KVok4uw5RftR38Wgp2BFwql
Step 4: Use the token in API calls
Once you extract the token from the URL, your app can use it to sign requests to the LiveChat API.
Your application should store the access_token in localStorage or a cookie until it expires. Caching the token prevents you from redirecting the user to LiveChat OAuth Server every time they visit your app.
Example implementation
This sample web app makes a call to Agent Chat API to return the list of customers, which is then logged in the console. The application uses the Implicit grant to get an access token.
index.html<!DOCTYPE html>
<html>
<body>
<script src="/get_customers.js"></script>
<script>
function getHashParam(key) {
var params = location.hash.substring(1).split("&");
var value = params.find(function (item) {
return item.split("=")[0] === key;
});
return value ? value.split("=")[1] : "";
}
const clientId = "bb9e5b2f1ab480e4a715977b7b1b4279"; // Client Id of your app
const redirectUri = "https://get-customers-app.samplehosting.com/"; // URL of your app
const accessToken = decodeURIComponent(getHashParam("access_token"));
if (accessToken) {
get_customers();
} else {
location.href =
"https://accounts.livechat.com/" +
"?response_type=token" +
"&client_id=" +
clientId +
"&redirect_uri=" +
redirectUri;
}
</script>
</body>
</html>
get_customers.jsconst get_customers = () => {
fetch('https://api.livechatinc.com/v3.1/agent/action/get_customers', {
method: 'post',
headers: {
'Content-type': 'application/json',
'Authorization': 'Bearer ' + accessToken,
},
body: JSON.stringify({})
})
.then((response) => response.json())
.then((data) => {
console.log('Request succeeded with JSON response', data);
})
.catch((error) => {
console.log('Request failed', error);
});
}
To make it work, run this app on localhost or deploy it to Firebase to host it. Update index.html with your own redirectUri (link to your app) and clientId.
Make sure to use the exact same Redirect URI in Developer Console. Also, to use the Get Customers method, your app needs the customers:ro scope, which you should select in Developer Console.
When everything is ready, install the app privately for your license.
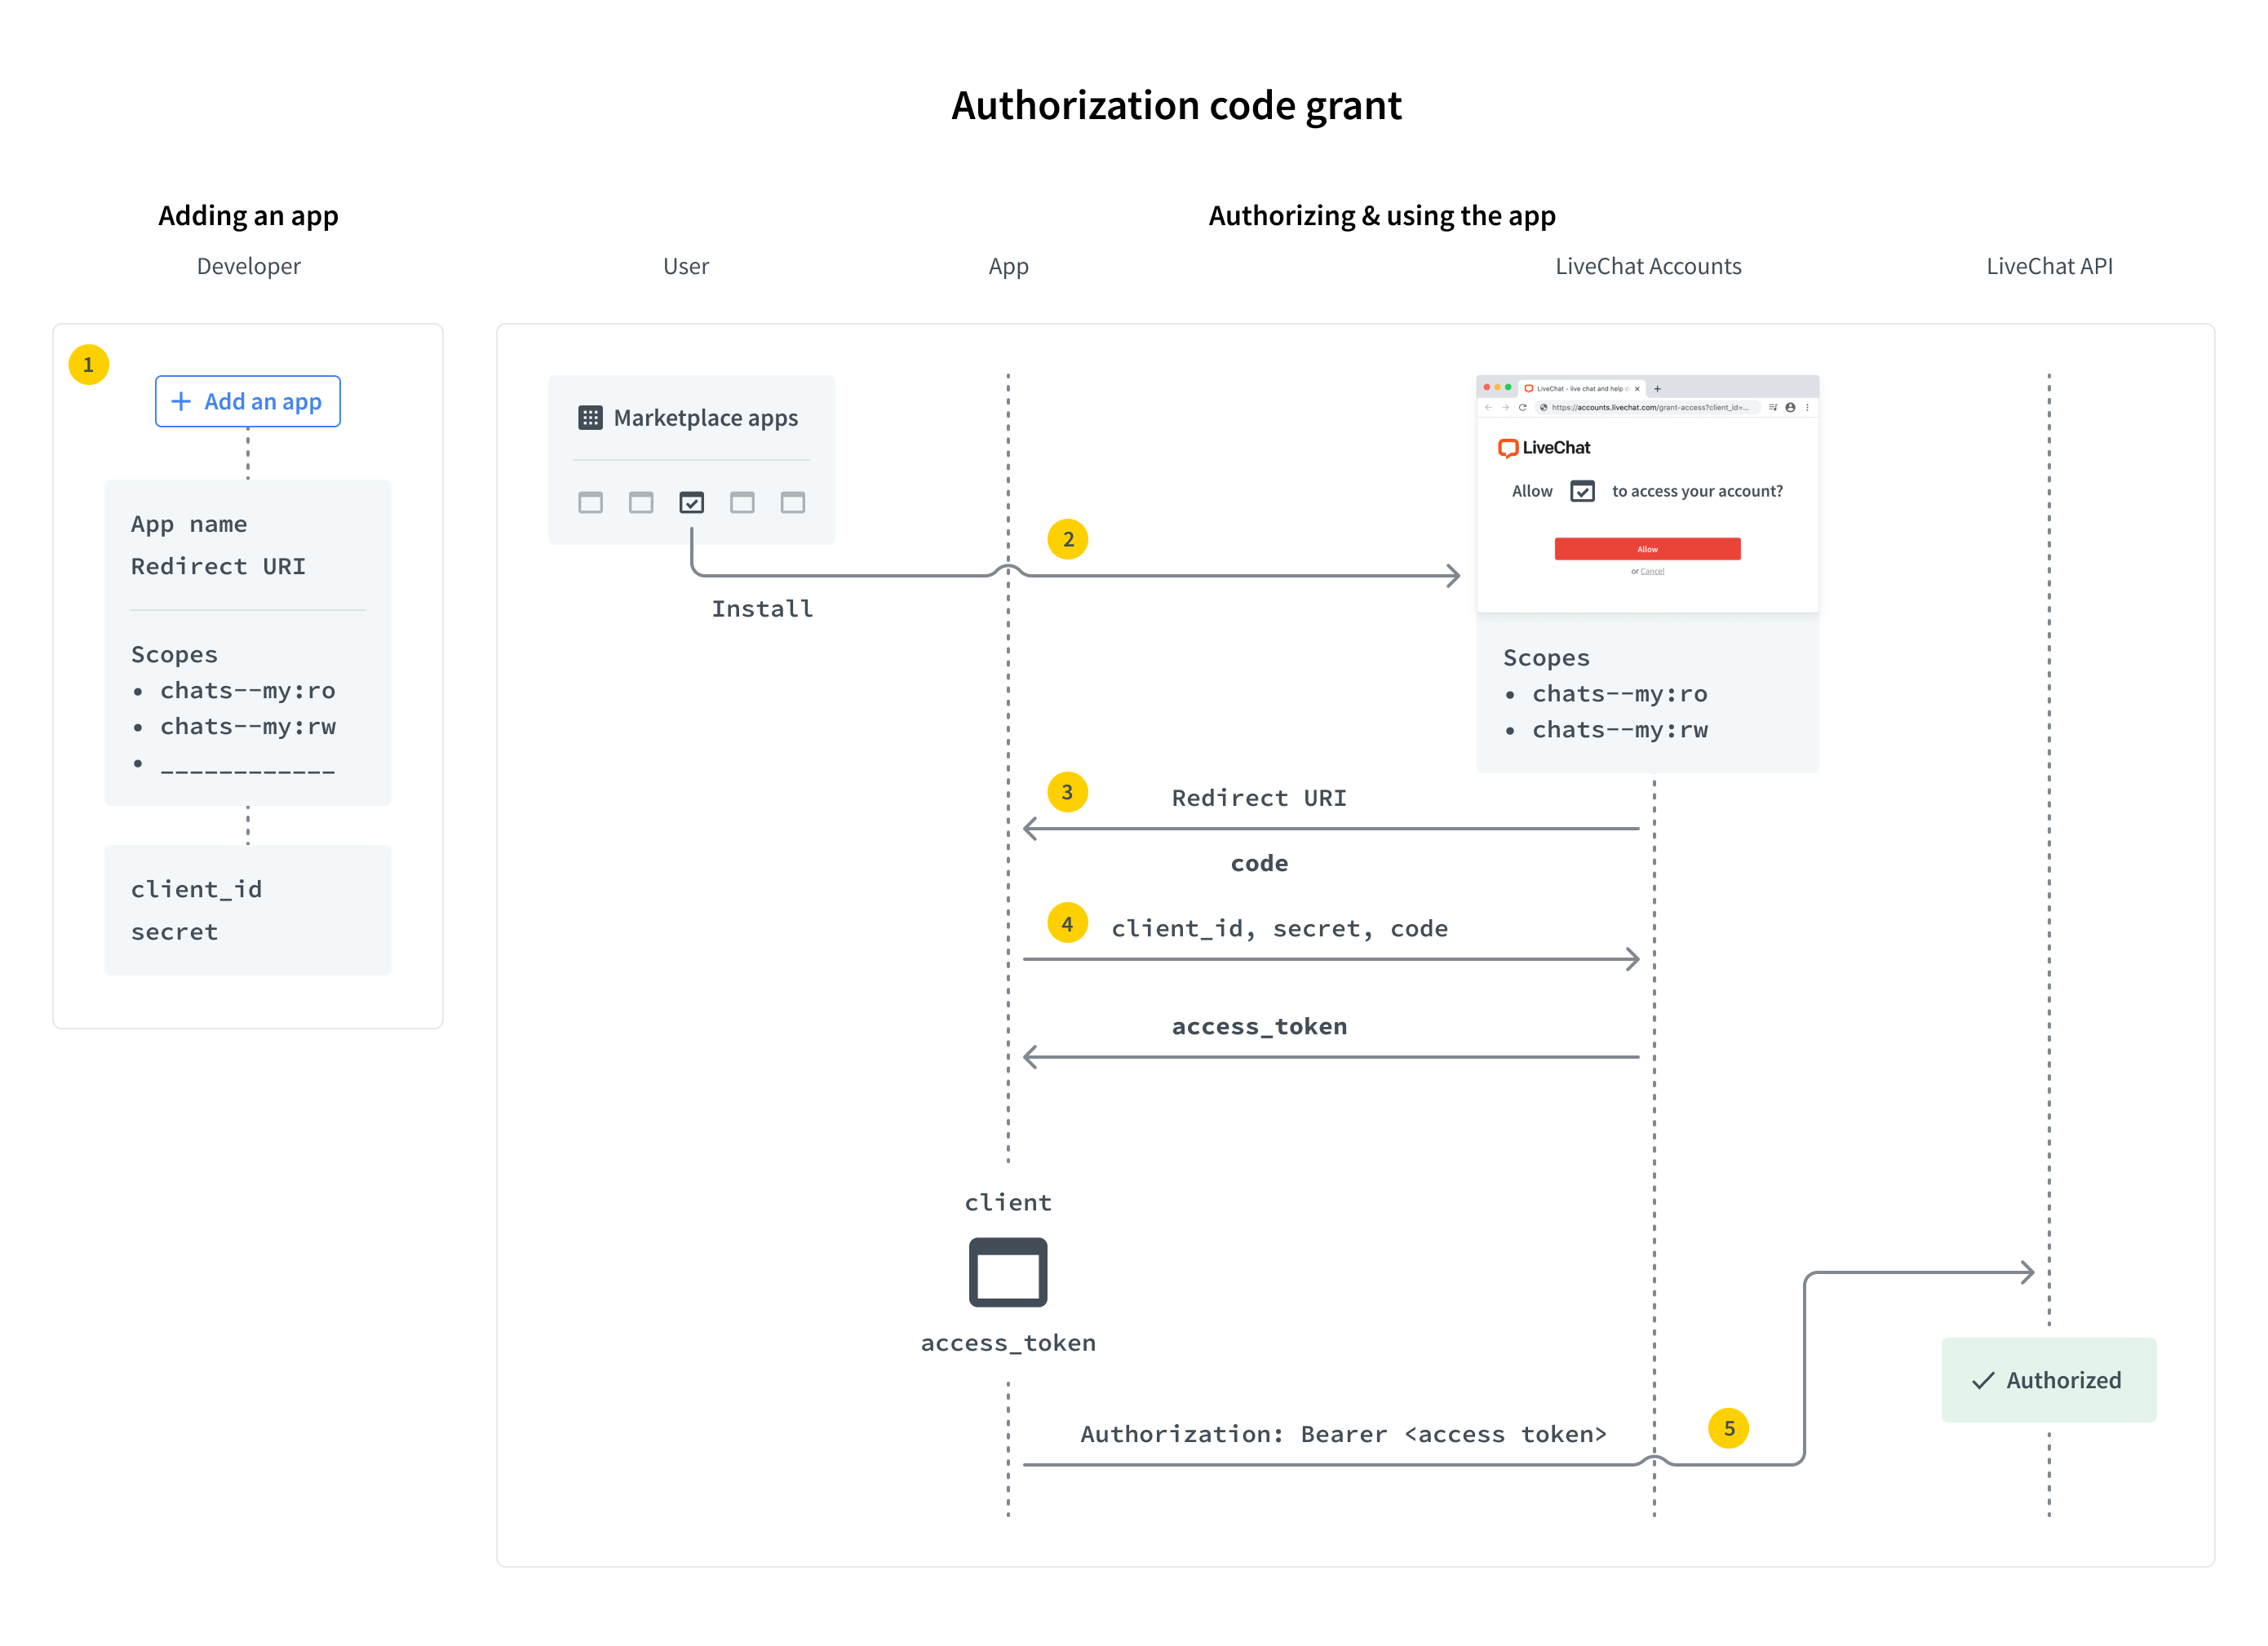
Authorization code grant
Authorization code grant flow is recommended for server-side apps. Unlike web apps, they can store confidential info, such as Client Secret, on a server without ever exposing it. When a user runs your app, they are redirected to the LiveChat OAuth Server only once. After successful authorization, the user is redirected back to your app along with a single-use authorization code. Then, your application exchanges the code for an access token and a refresh token using the Client Secret. From now on, the app can regenerate new access tokens without any action required from the user.
This flow is very similar to Implicit grant, but contains one additional step of exchanging the code for an access token.
The steps are as follows:
- Step 1: Create an app in Developer Console and configure the Authorization building block
- Step 2: Redirect the users of your app to the LiveChat OAuth Server
- Step 3: Get a code from the URL
- Step 4: Exchange the code for an access token
- Step 5: Use the token in API calls
PKCE extension
OAuth 2.1 introduces the PKCE (Proof Key for Code Exchange) extension for the Authorization code grant flow.
It allows web applications to use the Authorization code grant flow, and also, enables the possibility to use custom schema redirects, like: my_app: // (especially useful with native applications).
The Authorization code grant flow with PKCE is recommended for both web apps and server-side apps. Since web app clients can't store Client Secrets securely, their Authorization code grant flow with PKCE differs from the one for server-side apps.
- Web apps - Client Secret cannot be used, so it's not mandatory; refresh tokens rotate.
- Server-side apps - Client Secret is mandatory to exchange a code for an access token and to refresh a token; refresh tokens don't rotate.
How does the Authorization code grant flow work with PKCE?
- The client generates
code_verifierfrom the following characters:[A-Z] / [a-z] / [0-9] / "-" / "." / "_" / "~". It's between 43 and 128 characters long. - The client generates
code_challengewithcode_challenge_methodas follows:plain-code_challenge=code_verifier, when nocode_challenge_methodis present, thenplainis assumed.S256-code_challenge=b64(s256(ascii(code_verifier)))whereb64is Base64 URL encoding ands256is theSHA256hash function.
- The client sends
code_challengein the authorization request. - The server responds with the code.
- The client sends
code_verifierduring the exchane of the for an access token. - The server performs an additional validation for
code_challengeandcode_verifier. Upon successful validation, it returns the access token.
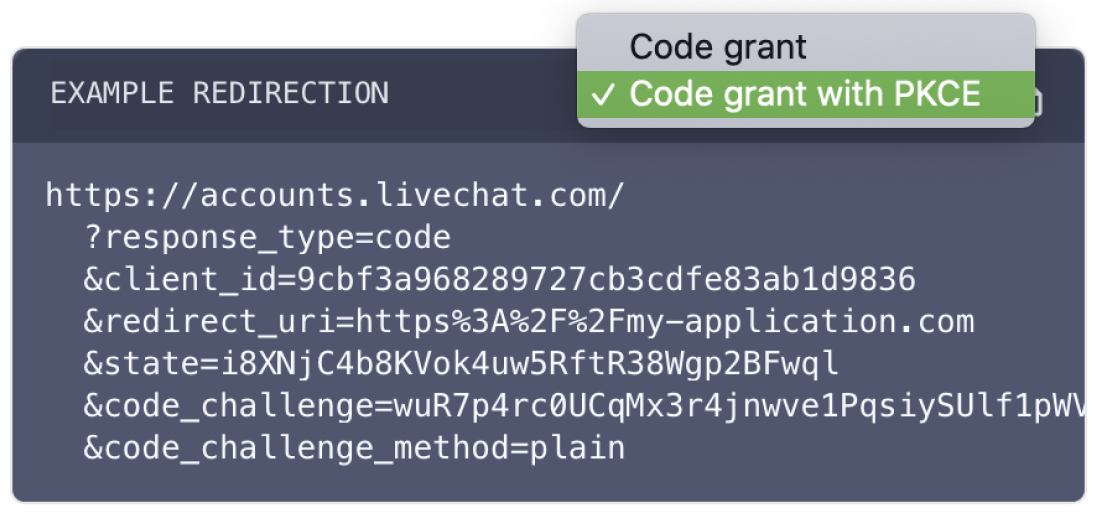
💡 To see code samples with PKCE parameters, use the dropdown list.
Step 1: Create an app
If you don't have an app yet, start by creating one in Developer Console. The app is a LiveChat OAuth 2.1 Client with its Id and Secret. You need to configure the Authorization building block of your application. See the guide to learn how to do that.
Step 2: Redirect users to LiveChat OAuth Server
When users run your app, they should be redirected to the LiveChat OAuth Server, which can be found under this URL:
https:/
Request
| Parameter | Required | Required with PKCE | Description |
|---|---|---|---|
response_type | yes | yes | Value: code |
client_id | yes | yes | Client Id from Developer Console (Authorization block) |
redirect_uri | yes | yes | One of the URIs defined in the Authorization block during app configuration. The LiveChat OAuth Server will redirect the user back to this URI after successful authorization. |
state | no | no | Any value that might be useful to your application. It's strongly recommended to include an anti-forgery token to mitigate the cross-site request forgery. |
code_challenge | no | yes | A string between 43 and 128 characters long. |
code_challenge_method | - | no | Possible values: s256 or plain; default: plain. |
EXAMPLE REDIRECTIONhttps://accounts.livechat.com/
?response_type=code
&client_id=9cbf3a968289727cb3cdfe83ab1d9836
&redirect_uri=https%3A%2F%2Fmy-application.com
&state=i8XNjC4b8KVok4uw5RftR38Wgp2BFwql
At this point, the app should ask the user to allow it to access certain resources and perform certain actions. The list of resources and actions is automatically created based on the scopes selected for your app in Developer Console.
Keep in mind that as the app author, you won't see this screen. Use prompt:consent to verify this step from the user perspective.
This step is also omitted for private server-side apps installed by Agents from the same license.
Step 3: Acquire the code
After a user authorizes the app by clicking Allow, they are redirected back to your application (to the Redirect URI you specified in Developer Console). The URL includes a number o parameters, including code.
Request
| Parameter | Notes |
|---|---|
code | A single-use code you need to exchange it for an access token. It's only valid for a few minutes. |
state | The value of the state param that you passed to LiveChat OAuth Server in redirection. |
https://my-application.com/
  ?code=test_7W91a-oMsCeLvIaQm6bTrgtp7
  &state=i8XNjC4b8KVok4uw5RftR38Wgp2BFwql
Step 4: Exchange code for access token and refresh token
To exchange the code for an access_token and a refresh_token, you need to make an HTTP POST request to the following URL:
https://accounts.livechat.com/v2/token
Request
| Parameter | Required | Required with PKCE server side app | Required with PKCE javascript app | Description |
|---|---|---|---|---|
grant_type | yes | yes | yes | Value: authorization_code |
code | yes | yes | yes | The authorization code returned from the request in the previous step. |
client_id | yes | yes | yes | Client Id from Developer Console (Authorization block) |
client_secret | yes | yes | no | Unique, confidential identifier of your app from Developer Console (Authorization block). |
redirect_uri | yes | yes | yes | The URI defined in Step 2. The LiveChat OAuth Server will redirect the user back to this URL after successful authorization. |
code_verifier | no | yes | yes | The previously generated code_verifier. |
Response
The response is a JSON with the following parameters:
| Parameter | Description |
|---|---|
access_token | A token you can use to call LiveChat APIs on behalf of the user. |
account_id | The ID of the Agent's account |
expires_in | A number in seconds specifying how long the access_token will be valid; 28800 sec by default. When it expires, you will need to generate new access_token using refresh_token (read Using the refresh token for more details). |
organization_id | The ID of the organization's account. |
refresh_token | A token that can be used to generate new access tokens. |
scope | A comma-separated list of permissions an access_token has. |
token_type | Value: Bearer |
💡 Got stuck? See common Errors.
EXCHANGE CODE FOR TOKENcurl "https://accounts.livechat.com/v2/token" \
-X POST \
-d "grant_type=authorization_code&\
code=dal:test_tnlRmy73mg9eaFESA&\
client_id=9cbf3a968289727cb3cdfe83ab1d9836&\
client_secret=test_d7MEp1YYo3&\
redirect_uri=https://my-application.com"
{
  "access_token": "dal:test_YTJQ6GDVgQf8kQDPw",
  "account_id": "b7eff798-f8df-4364-8059-649c35c9ed0c",
  "expires_in": 28800,
  "organization_id": "390e44e6-f1e6-0368c-z6ddb-74g14508c2ex",
  "refresh_token": "dal:test_gfalskcakg2347o8326",
  "scope": "chats--all:ro,chats--all:rw",
  "token_type": "Bearer"
}
Step 5: Use the token in API calls
Once you extract the token from the URL, yoour app can use it to sign requests to the LiveChat API.
Your application should store the access_token in localStorage or a cookie until it expires. Caching the token prevents you from redirecting the user to LiveChat OAuth Server every time they visit your app.
Using the refresh token
When an access_token expires, your app needs to acquire a new one. To do that, it has to send an HTTP POST request using the refresh_token.
https:/v2/token
Request
| Parameter | Required | Required with PKCE server side app | Required with PKCE javascript app | Description |
|---|---|---|---|---|
grant_type | yes | yes | yes | Value: refresh_token |
refresh_token | yes | yes | yes | The refresh token returned from when exchanging the code. |
client_id | yes | yes | yes | Client Id from Developer Console (Authorization block) |
client_secret | yes | yes | no | Unique, confidential identifier of your app from Developer Console (Authorization block). |
Response
The response is a JSON with the following parameters:
| Parameter | Description |
|---|---|
access_token | A token you can use to call LiveChat APIs on behalf of the user. |
account_id | The ID of the Agent's account |
expires_in | A number in seconds specifying how long the access_token will be valid. When it expires, you will need to generate new access_token using refresh_token (read Using the refresh token for more details). |
organization_id | the ID of the organization's account. |
scope | A comma-separated list of permissions an access_token has. |
refresh_token | A token that can be used to generate new access tokens. |
token_type | Value: Bearer |
💡 Got stuck? See common Errors.
GET A NEW ACCESS TOKENcurl "https://accounts.livechat.com/v2/token" \
-X POST \
-d "grant_type=refresh_token&\
refresh_token=dal:test_gfalskcakg2347o8326&\
client_id=9cbf3a968289727cb3cdfe83ab1d9836&\
client_secret=test_d7MEp1YYo3"
{
  "access_token": "dal:test_YTJQ6GDVgQf8kQDPw",
  "account_id": "b7eff798-f8df-4364-8059-649c35c9ed0c",
  "expires_in": 28800,
  "organization_id": "390e44e6-f1e6-0368c-z6ddb-74g14508c2ex",
  "scope": "chats--all:ro,chats--all:rw",
  "refresh_token": "dal:test_gfalskcakg2347o8326",
  "token_type": "Bearer"
}
Revoking tokens
In some cases, a user may wish to revoke the access (the token) given to your application. The token can be either an access token or a refresh token. If it's an access token with a corresponding refresh token, both tokens will be revoked. To revoke a token, make a DELETE HTTP request to the following URL:
https:/v2/token
Code snippets present two alternative ways of making the same request.
Request
| Parameter | Required | Description |
|---|---|---|
code | yes | The value of the access_token or the refresh_token to revoke |
💡 Got stuck? See common Errors.
REVOKE A TOKENcurl "https://accounts.livechat.com/v2/token"
-H "Authorization: Bearer <access_token|refresh token>"
-X DELETE
{}
Validating the access token
You can validate an access_token by making a GET HTTP request to the following URL:
https:/v2/info
Please note that refresh tokens are not supported for direct validation. If an access token was obtained using a refresh token, the response will return both tokens.
Response
The response is a JSON with the following parameters:
| Parameter | Description |
|---|---|
access_token | A token you can use to call LiveChat APIs on behalf of the user. |
account_id | The ID of the Agent's account |
client_id | Client Id of your app |
expires_in | A number in seconds specifying how long the access_token will be valid. When it expires, you will need to generate new access_token using refresh_token (read Using the refresh token for more details). |
organization_id | The ID of the organization's account. |
scope | A comma-separated list of permissions an access_token has. |
refresh_token | A token that can be used to generate new access tokens. Returned optionally. |
token_type | Value: Bearer |
💡 Got stuck? See common Errors.
VALIDATE AN ACCESS TOKENcurl "https://accounts.livechat.com/v2/info"
-H "Authorization: Bearer <access_token>"
{
    "access_token": "dal:test_YTJQ6GDVgQf8kQDPw",
    "account_id": "bbe8b147-d60e-46ac-a1e5-1e94b11ea6e1",
    "client_id": "9cbf3a968289727cb3cdfe83ab1d9836",
    "expires_in": 28725,
    "organization_id": "390e44e6-f1e6-0368c-z6ddb-74g14508c2ex",
    "scope": "chats--all:ro,chats--all:rw",
    "token_type": "Bearer"
}
Customer authorization flows
To authorize requests to the Customer Chat API, you'll need a different access token than the one used for the Agent Chat API and Configuration API.
Throughout the whole API documentation, we'll refer to it as customer_access_token.
Customer authorization flows allow you to receive an identity of a customer. You can do it via Cookie grant if you want to receive an identity of a single customer or via Agent token grant in order to manage multiple customer identities.
Cookie grant
Cookie grant is based on the __lc_cid and __lc_cst cookies, which store your customer identity data. These cookies are protected with the Secure and HttpOnly flags, which means that one can send the cookies only via HTTPS and only specific servers can access them.
The cookies are valid for 2 years, and each next call to https://accounts.livechat.com/customer/token extends their lifetime. The __lc_cid and __lc_cst cookies are necessary to recognize a customer when an access token is being issued.
This flow is recommended for frontend apps that support cookies, such as an app running in a web browser. Each app user has their own and unique customer identity.
Case: New customer
Use this variant to receive a new customer identity. To acquire an access token, make an HTTP POST request to the following URL:
https:/customer/token
Request
| Parameter | Required | Description |
|---|---|---|
grant_type | yes | Use cookie for this authorization flow |
client_id | yes | Client ID of your application |
license_id | yes | License ID for which the token is being issued |
redirect_uri | no | The LiveChat OAuth Server will redirect the user back to this URI after successful authorization. Possible values: the Origin header (default) or one of the URIs defined in the App Authorization block in Developer Console. The param is required if you defined a URI in the Console. |
Response
The response is a JSON with the following parameters:
| Parameter | Description |
|---|---|
access_token | A token you can use to call LiveChat APIs on behalf of the user (customer). |
client_id | Client Id of your app |
entity_id | The ID of the newly created customer |
expires_in | A number in seconds specifying how long you customer access_token will be valid; 28800 sec by default. When it expires, you will need to generate new access_token following Case: Existing customer). |
token_type | Value: Bearer |
The response also includes headers with the __lc_cid and __lc_cst cookies, for example:
Set-Cookie: __lc_cid=3aa138c1-c137-41c6-6b26-cface5857378; Path=/customer; Domain=accounts.livechat.com; Expires=Sun, 18 Jun 2023 12:26:02 GMT; Max-Age=63072000; HttpOnly; Secure; SameSite=None

Set-Cookie: __lc_cst=87b9d0222e63e349da85535d07c81e1e1fb938de41f4e16e1d9ba5965f25db4aeea46b39d0fb; Path=/customer; Domain=accounts.livechat.com; Expires=Sun, 18 Jun 2023 12:26:02 GMT; Max-Age=63072000; HttpOnly; Secure; SameSite=None
Your web browser will automatically store and attach these cookies to future requests when you try to acquire a new access token.
💡 Got stuck? See common Errors.
COOKIE GRANT: NEW CUSTOMERcurl "https://accounts.livechat.com/customer/token" \
-X POST
-d '{
"grant_type": "cookie",
"client_id": "9cbf3a968289727cb3cdfe83ab1d9836",
"license_id": 2491303,
"redirect_uri": "https://my-application.com"
}'
{
  "access_token": "dal:test_SZhSSbShcZxrv580FA",
  "client_id": "9cbf3a968289727cb3cdfe83ab1d9836",
  "entity_id": "bf18d1a8-1afe-4a3e-4cc0-a3148f1143db",
  "expires_in": 28800,
  "token_type": "Bearer"
}
Case: Existing customer
Use this option to generate a new access token for an already existing customer identity.
To achieve that, make the same exact same request as in Case: New customer.
Your entity_id, or any other customer identity data, won' be overwritten. The web browser will attach cookies to the server allowing it to recognize you as an existing customer. You'll get a new access token, and cookies' lifetime will be extended, too. They will be valid for 2 years from your last request to https://accounts.livechat.com/customer/token.
Case: Separating customer identity between groups
Use this option to generate a new access token for a customer (existing or a new one), but with a separate identity per group. This requires the chat_between_groups license property to be set to false.
All other parameters in this request are the same as in Case: New customer.
https:/v2/customer/<organization_id>/<group_id>/token
Agent token grant
Agent token grant lets you create customer identity and use it to act on behalf of a customer. To begin, you'll need an agent access token with the customers:own scope. You can get it via all of the Agent authorization flows except for Personal Access Tokens.
Agent token grant is recommended for backend integrations. It allows you to impersonate customers and simulate that they send messages from external systems, like Facebook Messenger or WhatsApp, in LiveChat. An integration that follows this authorization flow acts as a middleman between an external system and LiveChat, and it has the ability to manage multiple customer identities.
Case: New customer
First of all, make a HTTP POST request to create a new customer identity by calling the following URL:
https:/customer/token
Remember to authorize your request using the Authorization header with an agent access token.
Request
| Parameter | Required | Description |
|---|---|---|
grant_type | yes | Use agent_token for this authorization flow. |
client_id | yes | Client ID of your application |
entity_id | no | Customer ID. If you don't specify it, new customer identity will be created. Specify it if you want to acquire a new token for an existing customer identity. |
Response
The response is a JSON with the following parameters:
| Parameter | Description |
|---|---|
access_token | A token you can use to call LiveChat APIs on behalf of the user (customer). |
client_id | Client Id of your app |
entity_id | The ID of the newly created customer |
expires_in | A number in seconds specifying how long your customer access_token will be valid; 28800 sec by default. When it expires, you will need to generate new access_token following Case: Existing customer). |
token_type | Value: Bearer |
💡 Got stuck? See common Errors.
AGENT TOKEN GRANT: NEW CUSTOMERcurl "https://accounts.livechat.com/customer/token" \
-H "Authorization: Bearer <access_token>" \
-X POST
-d '{
"grant_type": "agent_token",
"client_id": "9cbf3a968289727cb3cdfe83ab1d9836",
"response_type": "token"
}'
{
  "access_token": "dal:test_SZhSSbShcZxrv580FA",
  "client_id": "9cbf3a968289727cb3cdfe83ab1d9836",
  "entity_id": "bf18d1a8-1afe-4a3e-4cc0-a3148f1143db",
  "expires_in": 28800,
  "token_type": "Bearer"
}
Case: Existing customer
Use this option to get a new access token for an already existing customer identity.
Make the same request as in Case: New customer, but this time, specify entity_id to avoid creating a new identity. You can find your entity_id in the response of the request to create a new customer identity.
AGENT TOKEN GRANT: EXISTING CUSTOMERcurl "https://accounts.livechat.com/customer/token" \
-H "Authorization: Bearer <access_token>" \
-X POST
-d '{
"grant_type": "agent_token",
"client_id": "9cbf3a968289727cb3cdfe83ab1d9836",
"entity_id: "bf18d1a8-1afe-4a3e-4cc0-a3148f1143db"
}'
{
  "access_token": "dal:test_SZhSSbShcZxrv580FB",
  "client_id": "9cbf3a968289727cb3cdfe83ab1d9836",
  "entity_id": "bf18d1a8-1afe-4a3e-4cc0-a3148f1143db",
  "expires_in": 28800,
  "token_type": "Bearer"
}
Identity token grant
Identity token grant lets you transfer a customer identity from one place to another, for example transfer the identity between devices or web browsers. To begin, you'll need a valid agent or customer access token.
Step 1: Generate an identity transfer token
First, you need to generate an identity transfer token by calling the following URL:
/customer/identity_transferhttps:/customer/identity_transfer
Remember to authorize your request using the Authorization header with an agent access token or a customer access token.
Request
| Parameter | Required | Description |
|---|---|---|
bearer_type | yes | agent – when authorizing with an agent access token, customer – when authorizing with a customer access token. |
client_id | yes | Client ID of your application |
customer_id | no | Customer ID of the customer whose identity will be transferred; required when authorizing with an agent access token. |
code_challenge | no | Code challenge; as described in PKCE extension |
Response
The response is a JSON with the following parameters:
| Parameter | Description |
|---|---|
identity_transfer_token | A token you can use to transfer an identity; you can exchange it for a customer access token. |
expires_in | A number in seconds specifying how long your identity transfer token will be valid; 3600 sec by default. |
IDENTITY TRANSFER: TOKEN GENERATIONcurl "https://accounts.livechat.com/customer/identity_transfer" \
-H "Authorization: Bearer <access_token>" \
-X POST
-d '{
"bearer_type": "agent",
"client_id": "9cbf3a968289727cb3cdfe83ab1d9836",
"customer_id": "bf18d1a8-1afe-4a3e-4cc0-a3148f1143db"
}'
{
  "identity_transfer_token": "dal:test_SZhSSbShcZxrv580FA",
  "expires_in": 28800,
}
Step 2: Exchange the identity transfer token
After you've obtained an identity transfer token, you're able to exchange it for a customer access token using the identity_transfer grant type. To do so, call:
/customer/tokenhttps:/customer/token
No authorization is required for this call.
Request
| Parameter | Required | Description |
|---|---|---|
grant_type | yes | Use identity_token for this authorization flow. |
client_id | yes | Client ID of your application |
code | yes | identity transfer token |
code_verifier | no | Code verifier; as described in PKCE extension. |
Response
The response is a JSON with the following parameters:
| Parameter | Description |
|---|---|
access_token | A token you can use to call LiveChat APIs on behalf of the user (customer). |
client_id | Client Id of your app |
entity_id | The ID of the newly created customer |
expires_in | A number in seconds specifying how long you customer access_token will be valid; 28800 sec by default. When it expires, you'll need to generate a new access_token following Case: Existing customer). |
token_type | Value: Bearer |
IDENTITY TRANSFER: TOKEN EXCHANGEcurl "https://accounts.livechat.com/customer/token" \
-X POST
-d '{
"grant_type": "identity_token",
"client_id": "9cbf3a968289727cb3cdfe83ab1d9836",
"code": "dal:test_SZhSSbShcZxrv580FA"
}'
{
  "access_token": "dal:test_SZhSSbShcZxrv580FA",
  "client_id": "9cbf3a968289727cb3cdfe83ab1d9836",
  "entity_id": "bf18d1a8-1afe-4a3e-4cc0-a3148f1143db",
  "expires_in": 28800,
  "token_type": "Bearer"
}
Revoking tokens
Look at the Customer Accounts API specification to find more details about revoking customer tokens.
Validating the access token
The instruction on how to validate customer access token of a customer is available in the Customer Accounts API specification.
Token limitations
There's a limit of 25 access tokens per client per user account. When the limit is reached, the oldest token is automatically revoked.
There's a limit of 25 refresh tokens per client per user account. When the limit is reached, the oldest token is automaticaly revoked.
There's a limit of 3 redirects in 30 seconds to the Livechat OAuth 2.1 server per client per user account. When the limit is reached, the server redirects to the error page with the
too_many_redirectserror details.
Redirect URI rules
You can configure many comma-separated redirect URIs for your application. The redirect URI in the Authorization request is valid when it matches one of the URIs configured for your app (client) in Developer Console.
URIs are composed of several parts:
- scheme (
http://,https://) - is required and must match exactly. See examples 10 and 11 in the table below. - host (
google.pl,localhost:3000, ...) - a hostname or IP and an optional port; is required and must match exactly. See examples 7, 8, and 9 in the table below. - path (
/info,/test, ...) - the client redirect URI path must be a substring of the authorization request redirect path; path traversals are forbidden. Optional. See examples 2, 3, 4, 5, and 6 in the table below. - query (
?size=20, ...) - is forbidden. - fragment (
#paragraph) - is forbidden.
Examples
Errors
All authorization errors redirect to the error page https://accounts.livechat.com/ooops, while authentication errors redirect to the login page https://accounts.livechat.com/.
Errors codes are returned in the query strings, in form of the oauth_exception parameter (for authorization errors) or identity_exception param (for authentication errors).
Additional exception_details may be passed with detailed information.
If you're looking for answers, see Authorization FAQ.
Authorization errors
invalid_request
The request is missing a required parameter, includes an invalid parameter value, includes a parameter more than once, or is otherwise malformed. Possible reasons:
- wrong HTTP method
- invalid HTTP body encoding
unauthorized_client
The client is not authorized to request a token using this method. Possible reasons:
- missing client ID
- client ID not found
- refresh token not found
- invalid client secret
- invalid redirect URI
access_denied
The resource owner or authorization server denied the request. Possible reasons:
- the requested scopes include a scope that wasn't originally granted by the resource owner
Not helpful? See access_denied in Authentication errors.
unsupported_response_type
The authorization server does not support obtaining a token using this method. Possible reasons:
- response type is not
codeortoken
invalid_scope
The requested scope is invalid, insufficient, unknown or malformed. Possible reasons:
- scope not found
- scope name not found
- an app requires the
administratorscopes, but instead, anagentuser was logged in
server_error
The authorization server encountered an unexpected condition that prevented it from fulfilling the request. Possible reasons:
- server down
- server storage down
Not helpful? See server_error in Authentication errors.
temporarily_unavailable
The authorization server is currently unable to handle the request due to a temporary overloading or maintenance of the server. Currently not used.
unsupported_grant_type
The authorization grant type is not supported by the authorization server.
- using disabled authorization grant type, for example client credentials grant; read more...
invalid_grant
The provided authorization grant (e.g., authorization code, resource owner credentials) or refresh token is invalid, expired, revoked, does not match the redirection URI used in the authorization request, or was issued to another client. Possible reasons:
- refresh token expired
- access token expired
invalid_client
Client authentication failed (e.g., unknown client, no client authentication included, or unsupported authentication method). Possible reasons:
- using refresh token with wrong client id
missing_grant
The client is missing granted rights. Possible reasons:
- grants were rejected
- grants were never given
- client changed required grants
Exception details
client_id_not_found - wrong client ID, client id does not exists
redirect_uri_not_set - client misconfiguration, the client has not set a redirect URI
invalid_redirect_uri - redirect URI is not one of the client's allowed redirects
too_many_redirects - the server has detected a redirect loop; the client shouldn't redirect too many times
Authentication errors
invalid_request
The request is missing a required parameter, includes an invalid parameter value, includes a parameter more than once, or is otherwise malformed.
Not helpful? See invalid_request in Authorization errors.
unauthorized
The request is valid, but identity data is wrong or identity does not exists. If identity id is known, it's added to querystring as entity_id.
server_error
The server encountered an unexpected condition that prevented it from determining identity.
Not helpful? See server_error in Authorization errors.
access_denied
The identity is known, but access is denied because of business reasons. For example, identity can be banned or have the wrong account version, etc.
Not helpful? See access_denied in Authorization errors.
identity_lost
The identity was removed due logout, password reset, remote logout, etc.
credentials_login_disabled
Identity has disabled credentials login strategy. Identity should be verified with other stategies like Google Oauth or SAML.
Contact us
If you have questions, see Authorization FAQ or contact us at developers@livechat.com.